Notification을 클릭했을 시 실행될 화면 추가하기.
목표
사용자가 Notification을 클릭하면 해당 Task의 AddEditTaskFragment 화면으로 실행한다.
Content Intent 추가시키기
사용자가 Notification을 클릭했을 때 실행될 화면을 등록하는 란이 Content Intent이다.
Notification Action들과 마찬가지로 PendingIntent를 추가시킬 수 있다.
차이점은 Action에서는 Broadcast를 PendingIntent형태로 만든 것을 추가 시켰고,
ContentIntent는 App의 스크린 중 하나에 접근하기 위해서 Activity를 PendingIntent 형태로 만든 것을 추가시킨다.
PendingIntent contenetIntent = PendingIntent.getActivity(...);위와 같은 코드로 Activity를 PendingIntent로 만들 수 있다.
이번 프로젝트에는 싱글 액티비티 - 멀티플 프래그먼트를 사용하므로 우리가 만들어야할 진입 시점은 Activity가 아니라 Fragment이다.
그래서 Activity 위에 실행될 Fragment들을 TaskStackBuilder를 사용해서 백스택에 쌓은 후 PendingIntent로 변환하는 방법을 사용한다.
하지만 Navigation을 위해서 NavController를 사용할 때는 TaskStackBuilder없이 DeepLink를 사용하면 nav_graph.xml의 정보를 가지고 진입 시점을 가진 PendingIntent 생성할 수 있다.
첫번째 시도. 에러난 코드.
PendingIntent createPendingIntent(Context context) {
    NavController navController = getNavController(context);

    // xml file name of navigation graph.
    navController.setGraph(R.navigation.nav_graph);

    return navController.createDeepLink()
        .setDestination(R.id.your_destination_fragment)
        .createPendingIntent();
}
위 코드를 이용해서 PendingIntent를 만들었는데 에러가 났다.
해결방법은 Explicit DeepLink를 생성할때는 NavDeepLinkBuilder를 사용하는 것이다.
PendingIntent createPendingIntent(Context context) {
    return NavDeepLinkBUilder(context)
        .setGraph(R.navigation.nav_graph)
        .setDestination(R.id.your_destination_fragment)
        .createPendingIntent();
}
위 코드로 DeepLinkBuilder를 이용해서 PendingIntent가 만들어지고 Notification에 잘 등록 되는 것을 확인할 수 있다.
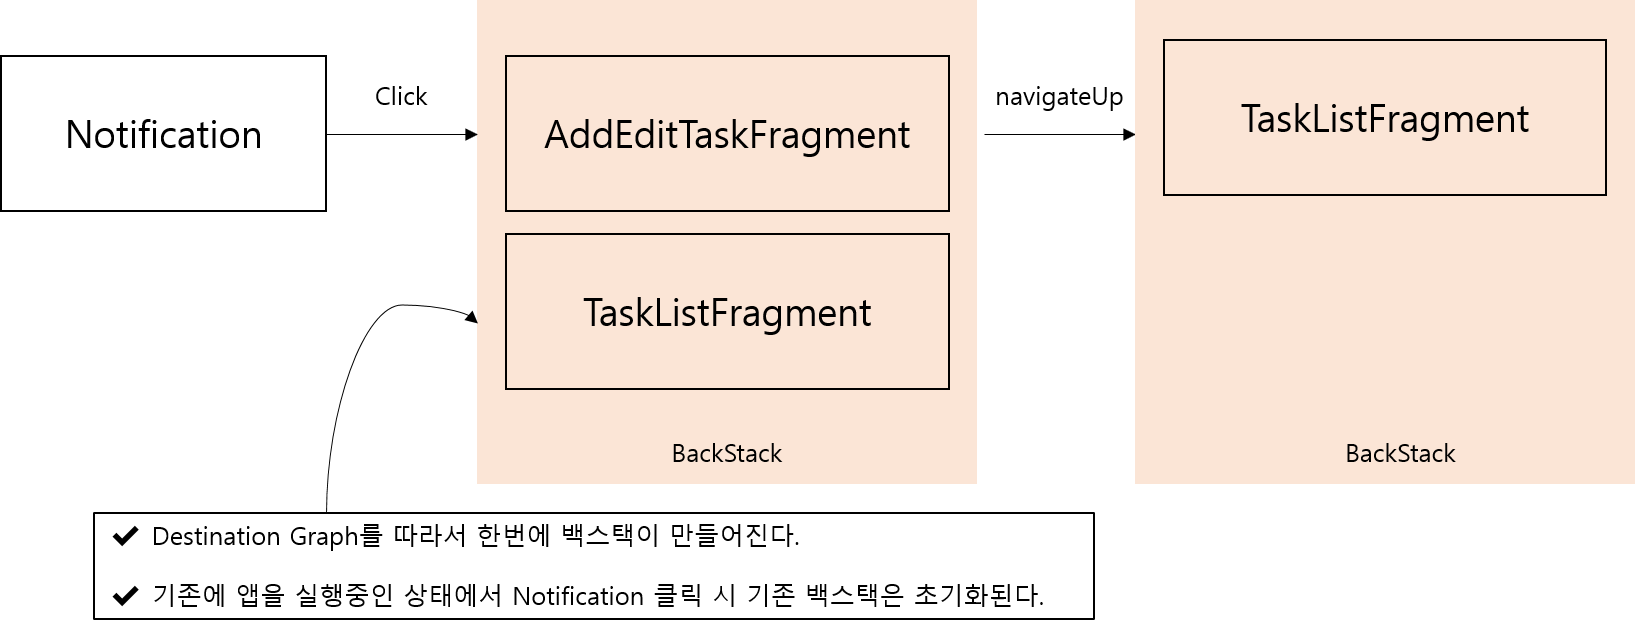
Explicit DeepLink의 특징
- 기존 백스택에 있던 내용이 모두 초기화 되고 DeepLink가 추가된다.
- graph.xml에서 지정한 Destination에 접근하기 위해 필요한 부모 Destination들도 모두 백스택에 추가된다.
- 그러므로 navigateUp()을 실행하면 초기 Destination의 부모화면으로 이동한다.
'Android' 카테고리의 다른 글
| Dagger setup with WorkManager (0) | 2019.12.13 |
|---|---|
| WorkManager (0) | 2019.12.12 |
| Reminder 기능 구현하기 (0) | 2019.11.24 |
| Logic 분리하기 (0) | 2019.11.01 |
| EditText Scrollable (0) | 2019.10.25 |


